The King of the Planets
Jupiter is really easy to find among the stars because it's so bright! In the night sky, the only brighter natural objects are the moon and Venus.
Jupiter was one of my earliest targets because it was so easy to find. It's also relatively easy to get decent focus but I still haven't nailed down the needle sharp focus I'd like.
This sequence shows my progress with Jupiter over the years.
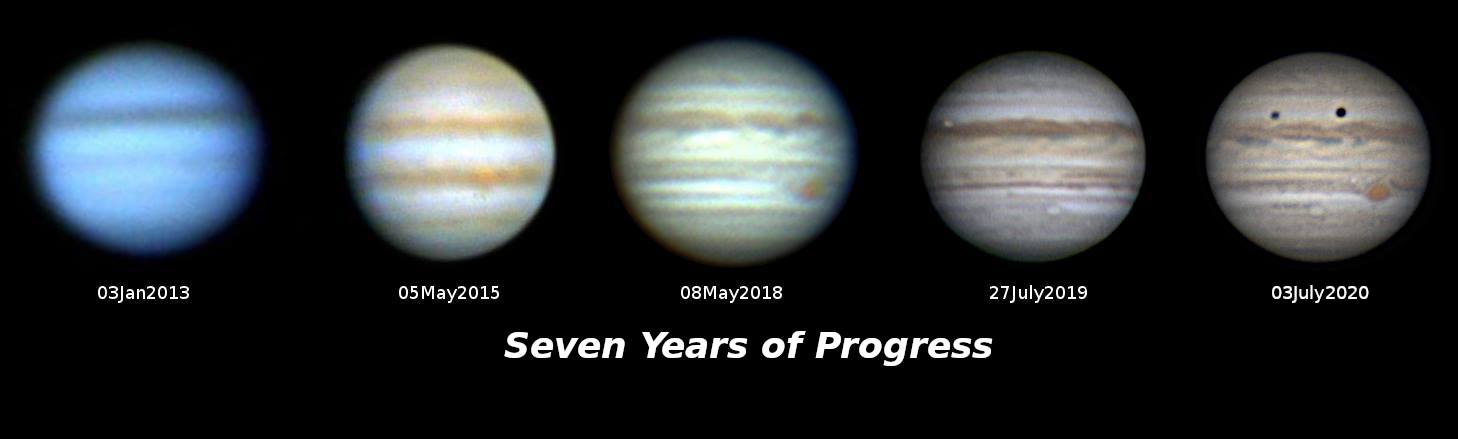
2013:
The first image shows some of my earliest attempts to capture Jupiter using a 6" Meade Newtonian telescope and a homebrew astronomy camera made from a Logitech C270 webcam. This was the stock Newtonian without a Barlow lens. I took about 8 frames that I manually stacked in Gimp (not the best way to do this).

It's not much to look at but you can tell it's Jupiter. At the time, the southern equatorial band had faded for reasons that I don't think have been determined yet.
2015:
A couple years later, I got a Celestron C8-A XLT on the Celestron GEM G-5 Advanced mount. This allowed longer tracking but I will wasn't quite getting what I wanted. This was also still using the homebrew astronomy camera without a Barlow lens so it makes a very small image on the camera's chip.

This was still only about 8 images stacked and averaged but this time I used Registax. I didn't know the first thing about wavelets, color correction or really much of anything. But there is some improvement as you can start to see some detail including the orange of the Great Red Spot.
2018:
I was still using the homebrew astronomy camera but I added a 3X Barlow to my kit.

You can now see some of the festooning in the cloud bands and a bit of detail around the Great Red Spot. But one of the problems with using the web camera is setting the proper exposure.
At this point, I started shooting video instead of still frames. This was about 30 seconds at about 15 frames per second. Using Registax, I had it select about 60% of the best frames to average. I didn't do a lot of processing with wavelets as I recall.
You'll also notice that the image is a little more red on the left side than the right side. That's chromatic aberration which comes from passing light through the Barlow. But that can be corrected.

Learning how to correct for that color aberration was a small thing but,as you can see, it does make a difference.
2019:
One of the biggest changes in my gear was the purchase of a dedicated planetary imaging camera when I bought a ZWO ASI120MC-S camera. It went nicely with the new laptop I bought for doing this and other astronomy related work.
I'd also purchased a Bahtinov mask for assisting with focus.

This was a full minute of frames but still at a fairly slow frame rate around 15 to 20 frames per second. I learned that because I was shooting the full frame in the camera which is 1280 x 960. The planet only covers about ¼ of that. The video was shot in the AVI codec which is only 8 bits so there is considerable loss of detail between the camera and the video.
I also started using Autostakkert! for stacking the images and automatically aligning the colors. Registax wavelets brought out quite a bit of detail including the moon Io at the top left just above the northern equatorial belt.
2020:
In all my years of imaging, I'd never managed to get a picture of the shadows of Jupiter's moons crossing the planet. This summer changed that.

As I captured the video, I cropped the image to 800 x 640 which sped the frame rate to over 120 fps! This was 3 minutes of video and I had more than 12,000 frames to process which improves the signal to noise ratio considerably. Even with stacking only 25% of the frames, it was still a lot more than I'd had before.
Again, the frames were stacked using Autostakkert! and processed with Registax for wavelet functions.
The dark spot on the left is the moon Ganymede and the spot on the right is its shadow.
Here is the image full size.

I'm fairly pleased with this image but I know I can do better!
Comments
Post a Comment